Create a subtask process that will allow for tasks to be sequenced in a specific order. This is a static process that mimics the OOTB subtask sequencing found natively in FPSC v.11. There are three stages of subtasks: the first stage is a single subtask, the second stage consists of two subtasks, the third stage is a single subtask. Each stage may be edited only in sequence while other stages will remain in an Inactive status and inability to edit by any user. As each stage is resolved, the next sequential stage of tickets will change to a status of Open. Once all subtasks are resolved, the master ticket is resolved.
Applicability
FootPrints Service Core version 12.x running on Microsoft Windows Server 2008/2012.
Prerequisites
- Administrator access to FPSC v.12.
- A complete workspace container with a ticket item.
- Assumption that the following fields exist, with the minimal choices, on the ticket item.
- Status (Single Select; Choices – Open, Inactive, In-Progress, Pending, On-Hold, Resolved, Closed)
- Impact (Single Select; Choices – Low, Medium, High)
- Category (Single Select; Choices – New Hire)
- Subcategory (Single Select; Choices – Full Time)
- Template Name (Simple Text with hidden permission)
- Urgency (Single Select; Choices – Low, Medium, High)
- Assignee
- Priority
- Short Description
- Subtask Sequence Complete (Boolean with hidden permission)
- Subtask Sequencing (Integer with hidden permission)
- Description
- First Name (Simple Text)
- Last Name (Simple Text)
- User ID (Simple Text)
- Department (Simple Text)
- Email Address (Simple Text; Validated as Email)
BACKGROUND
FootPrints Service Core version 12 does not have the built-in subtask sequencing capability that exists in FootPrints Service Core version 11. An administrator of FootPrints Service Core version 11 can setup a static process with sequenced subtasks for workflow processing while Administrators and agent users can sequence subtasks on the fly. This document will explain how to build a static subtask sequence as an Administrator in FootPrints Service Core version 12.
This will outline the process necessary to replicate static subtask sequencing for a three-stage sequence process that utilizes four quick templates.
THE SOLUTION
The build items consist of:
- Master/Subtask relationship
- Fields with “Hidden” permissions
- Addition of “Inactive” added to the Status field
- Placement of “Hidden” fields on agent and customer web forms
- Quick Templates and linking
- Workflow Process
- Business rules
- Role settings
Master/Subtask relationship
The relationship is built with the Link Type of Master/Subtask. The containers and items will be set to the same container and item in this example.

Fields with “Hidden” permissions
- The “Subtask Sequence Complete” field is a Boolean field that is set with “Hidden” permissions
- The “Subtask Sequencing” field is an Integer field that is set with “Hidden” permissions
- The “Template Name” field is a simple text field that is set with “Hidden” permissions


Addition of “Inactive” added to the Status field
- Add a choice of “Inactive” to the status field
Placement of “Hidden” fields on agent and customer web forms
The placement of the “Hidden” fields is preference. The fields are typically placed at the bottom of the last section in a form. Fields will be added to both the agent web and customer web forms.
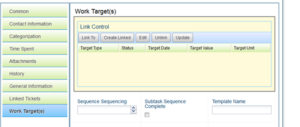
Quick Templates and linking
Four templates are used for this sequence process; New Hire, Create an AD Account, Create an active badge, Provide a mobile phone, Provide a computer. The templates are built with all required field values, Template Name field value, Subtask Sequence field value, assignment value. The “New Hire” will serve as the master template. Other templates will be linked to the “New Hire” template with the “Master/Subtask:Subtask” relationship.
- “New Hire” will be selected for use on the Agent Web and Customer Web forms. The “Name” field of the quick template will be “New Hire”. In the “Field Values” section, click “Add” for all necessary fields. The “Status” field will be set to “Open” as this will be used as the master task. Sample fields are:
- Status with value of “Open”
- Impact with value of Low
- Category with value of “New Hire”
- Subcategory with value of Full Time
- Template Name with value of “New Hire”– This is a “Hidden” field that will be used as criteria for actions to occur.
- Urgency with value of “I can still work”
- Assignee with value of creator’s team or creator
- Priority with value of “Low”
- Short Description with value of “New Hire”
- Subtask Sequence Complete with value of false
- Subtask Sequencing with value of 0 (zero)
- Description with value of “New Hire”
- “Create an AD Account” will not be used with any form but only from the “New Hire” master ticket. The “Name” field of the quick template will be “Create an AD Account”. In the “Field Values” section, click “Add” for all necessary fields. The “Status” field will be set to “Open” as this will be the first subtask.
- Status with value of “Open”
- Impact with no value and the Inherit box selected
- Category with no value and the Inherit box selected
- Subcategory with no value and the Inherit box selected
- Template Name with value of “Create an AD Account” – This is a “Hidden” field that will be used as criteria for actions to occur.
- Urgency with no value and the Inherit box selected
- Assignee with value of the responsible team
- Priority with no value and the Inherit box selected
- Short Description with value of “Create an AD Account”
- Subtask Sequence Complete with value of false
- Subtask Sequencing with value of 1 (one)
- Description with value of “Create an AD Account”
- First Name with no value and the Inherit box selected
- Last Name with no value and the Inherit box selected
- User ID with no value and the Inherit box selected
- Department with no value and the Inherit box selected
- Email Address with no value and the Inherit box selected
- “Create an active badge” will not be used with any form but only from the “New Hire” master ticket. The “Name” field of the quick template will be “Create an active badge”. In the “Field Values” section, click “Add” for all necessary fields. The “Status” field will be set to “Inactive” as this will be the second sequence of subtasks.
- Status with value of “Inactive”
- Impact with no value and the Inherit box selected
- Category with no value and the Inherit box selected
- Subcategory with no value and the Inherit box selected
- Template Name with value of “Create an active badge” – This is a “Hidden” field that will be used as criteria for actions to occur.
- Urgency with no value and the Inherit box selected
- Assignee with value of the responsible team
- Priority with no value and the Inherit box selected
- Short Description with value of “Create an active badge”
- Subtask Sequence Complete with value of false
- Subtask Sequencing with value of 2 (two)
- Description with value of “Create an active badge”
- First Name with no value and the Inherit box selected
- Last Name with no value and the Inherit box selected
- User ID with no value and the Inherit box selected
- Department with no value and the Inherit box selected
- Email Address with no value and the Inherit box selected
- “Provide a mobile phone” will not be used with any form but only from the “New Hire” master ticket. The “Name” field of the quick template will be “Provide a mobile phone”. In the “Field Values” section, click “Add” for all necessary fields. The “Status” field will be set to “Inactive” as this will be the second sequence of subtasks.
- Status with value of “Inactive”
- Impact with no value and the Inherit box selected
- Category with no value and the Inherit box selected
- Subcategory with no value and the Inherit box selected
- Template Name with value of “Provide a mobile phone” – This is a “Hidden” field that will be used as criteria for actions to occur.
- Urgency with no value and the Inherit box selected
- Assignee with value of the responsible team
- Priority with no value and the Inherit box selected
- Short Description with value of “Provide a mobile phone”
- Subtask Sequence Complete with value of false
- Subtask Sequencing with value of 2 (two)
- Description with value of “Provide a mobile phone”
- First Name with no value and the Inherit box selected
- Last Name with no value and the Inherit box selected
- User ID with no value and the Inherit box selected
- Department with no value and the Inherit box selected
- Email Address with no value and the Inherit box selected
- “Provide a computer” will not be used with any form but only from the “New Hire” master ticket. The “Name” field of the quick template will be “Provide a computer”. In the “Field Values” section, click “Add” for all necessary fields. The “Status” field will be set to “Inactive” as this will be the third sequence of subtasks.
- Status with value of “Inactive”
- Impact with no value and the Inherit box selected
- Category with no value and the Inherit box selected
- Subcategory with no value and the Inherit box selected
- Template Name with value of “Provide a computer”– This is a “Hidden” field that will be used as criteria for actions to occur.
- Urgency with no value and the Inherit box selected
- Assignee with value of the responsible team
- Priority with no value and the Inherit box selected
- Short Description with value of “Provide a computer”
- Subtask Sequence Complete with value of false
- Subtask Sequencing with value of 3 (three)
- Description with value of “Provide a computer”
- First Name with no value and the Inherit box selected
- Last Name with no value and the Inherit box selected
- User ID with no value and the Inherit box selected
- Department with no value and the Inherit box selected
- Email Address with no value and the Inherit box selected
- Quick Template Linking the subtasks to the “New Hire” master task
- Select the “New Hire” template and “Edit”
- Select the “Linked Quick Templates” section
- Select “Add Link”
- Select the “Link Type” of Master/Subtask:Subtask
- Select the “Quick Template” of “Create an AD Account”
- Select Add
- Repeat the quick template linking for each subtask of “Create an active badge”, Provide a mobile phone”, “Provide a computer”
Workflow Process
A basic workflow is created from the state field of status with no defining criteria in this example. The effect of this workflow is to assist with the control of the status selection when a new ticket is created. A new ticket may be created by any user in the “Open” status but not in an “Inactive” status. A ticket will only be created in “Inactive” status by a subtask used in this process. Additional control of creating and editing tickets in the “Open” and “Inactive” status is performed through role permissions.
- Creating the workflow
- From the Workflow Process section, select “New Workflow Process”
- Select the Workflow State field of status
- Select the status fields in the order of; Open, Inactive, In-Progress, Pending, On-Hold, Resolved, Closed
- Select Create Workflow Process
- Transition lines will be drawn as follows
- Start to Inactive
- Start to Open
- Start to In-Progress
- Inactive to Open
- Open to Resolved
- Open to In-Progress
- In-Progress to Resolved
- In-Progress to On-Hold
- In-Progress to Pending
- Pending to In-Progress
- On-Hold to In-Progress
- Resolved to Closed
- Name the workflow “Service Request Workflow”
- Select Save
Business Rules
There are eight business rules that mimic this three-stage subtask sequencing. A subtask sequence process that is more than three stages will require additional business rules. These business rules provide for a three-stage static sequence only.
- Complete Sequence 1 (On Screen)
- From the Business Rule section, select New Business Rule and then select On Screen rule
- Name the rule “Complete Sequence 1”
- The state is Active
- The business rule schedule is “Run Any Time”
- The trigger is set to On Screen : On Update
- There are three criteria: Subtask Sequence Complete equal to false, Status equal to Resolved, Subtask Sequencing equal to 1
- The action is Set field value of Subtask Sequence Complete to true

- Set the Master Sequence to 1 (After Save)
- From the Business Rule section, select New Business Rule and then select After Save rule
- Name the rule “Set the Master Sequence to 1”
- The state is Active
- The business rule schedule is “Run Any Time”
- The trigger is set to On Linked Item Update : Master/Subtask:Subtask
- The criteria is built on Generic Linking of Master/Subtask:Subtask and contains three supporting criteria: Subtask Sequencing equal to 1, Status equal to Resolved, Subtask Sequence Complete equal to true
- There are two actions: Set field value of Status to In-Progress, Set field value of Subtask Sequencing to 1

- Update the Sequence 2 subtasks status to Open
- From the Business Rule section, select New Business Rule and then select After Save rule
- Name the rule “Update the Sequence 2 subtasks status to Open”
- The state is Active
- The business rule schedule is “Run Any Time”
- The trigger is set to On Linked Item Update : Master/Subtask:Master
- The criteria is built on Any Generic Linking of Master/Subtask:Master with supporting criteria of Subtask Sequencing equal to 1. One additional criteria not included in the Generic Linking is Subtask Sequencing equal to 2. One final criteria not included in the Generic Linking is Subtask Sequence Complete equal to false
- The action is Set field value of Status to Open

- Complete Sequence 2 (On Screen)
- From the Business Rule section, select New Business Rule and then select On Screen rule
- Name the rule “Complete Sequence 2”
- The state is Active
- The business rule schedule is “Run Any Time”
- The trigger is set to On Screen : On Update
- There are three criteria: Subtask Sequence Complete equal to false, Status equal to Resolved, Subtask Sequencing equal to 2
- The action is Set field value of Subtask Sequence Complete to true

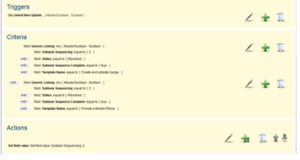
- Set the Master Sequence to 2 (After Save)
- From the Business Rule section, select New Business Rule and then select After Save rule
- Name the rule “Set the Master Sequence to 2”
- The state is Active
- The business rule schedule is “Run Any Time”
- The trigger is set to On Linked Item Update : Master/Subtask:Subtask
- The criteria is built on Any Generic Linking of Master/Subtask:Subtask and contains four supporting criteria: Subtask Sequencing equal to 2, Status equal to Resolved, Subtask Sequence Complete equal to true, Template Name equal to “Create an active badge”. One additional criteria is built on Any Generic Linking of Master/Subtask:Subtask and contains four supporting criteria: Subtask Sequencing equal to 2, Status equal to Resolved, Subtask Sequence Complete equal to true, Template Name equal to “Provide a mobile phone”
- The action is Set field value of Subtask Sequencing to 2
- Update the Sequence 3 subtasks status to Open
- From the Business Rule section, select New Business Rule and then select After Save rule
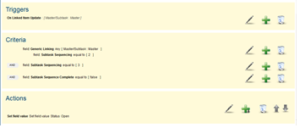
- Name the rule “Update the Sequence 3 subtasks status to Open”
- The state is Active
- The business rule schedule is “Run Any Time”
- The trigger is set to On Linked Item Update : Master/Subtask:Master
- The criteria is built on Any Generic Linking of Master/Subtask:Master with supporting criteria of Subtask Sequencing equal to 2. One additional criteria not included in the Generic Linking is Subtask Sequencing equal to 3. One final criteria not included in the Generic Linking is Subtask Sequence Complete equal to false
- The action is Set field value of Status to Open
- Complete Sequence 3 (On Screen)
- From the Business Rule section, select New Business Rule and then select On Screen rule
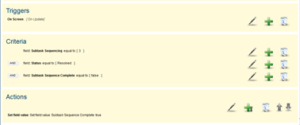
- Name the rule “Complete Sequence 3”
- The state is Active
- The business rule schedule is “Run Any Time”
- The trigger is set to On Screen : On Update
- There are three criteria: Subtask Sequence Complete equal to false, Status equal to Resolved, Subtask Sequencing equal to 3
- The action is Set field value of Subtask Sequence Complete to true
- Resolve the master on resolution of all subtasks (After Save)
- From the Business Rule section, select New Business Rule and then select After Save rule
- Name the rule “Resolve the master on resolution of all subtasks”
- The state is Active
- The business rule schedule is “Run Any Time”
- The trigger is set to On Linked Item Update : Master/Subtask:Subtask
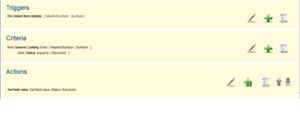
- The criteria is built on every Generic Linking of Master/Subtask:Subtask with supporting criteria of Status equal to Resolved
- The action is Set field value of Status to Resolved
Role Settings
Existing roles will be edited for this purpose. The roles to focus on are for the Agent and the Customer Request Read/Submit/Edit. The roles are edited to allow or disallow permissions for viewing, editing, field permissions, and workflow permissions. Roles are located on the Administration tab under User Management. Select Roles and locate the agent and customer roles in the Service Request container. System roles will not be changed for this exercise.
- Agent Role
- Edit the agent role and select the Service Request item on the Role Information section
- Select the Item Permissions section
- Expand Service Request
- Expand Viewing and select Yes at the top level and Yes on the Item Name for All
- Expand Workflow Name for Service Request Workflow and validate that all status has Yes selected
- Create will be set to Yes
- Expand Edit Item and select Yes at the top level and Yes on the Item Name for All
- Expand Workflow Name for Service Request Workflow and select No for the states of Inactive and Closed. All other states are set to Yes
- Select the Field Permissions section and validate that all fields are set to Edit with the following exceptions that will remain View: Created On, Created By, Updated On, Updated By, Service Request Number. Specifically, the fields of Subtask Sequence Complete, Subtask Sequencing, and Template Name will be set to edit as these fields are affected by a business rule
- Select the Workflow Permissions section and expand Service Request and Service Request Workflow. Validate that all Access is set to Yes with exceptions. Those exceptions are Resolved to Closed and Start to Inactive which are set to No
- Customer Request Read/Submit/Edit
- Edit the agent role and select the Service Request item on the Role Information section
- Select the Item Permissions section
- Expand Service Request
- Expand Viewing and select Yes at the top level and appropriate viewing permissions
- Expand Workflow Name for Service Request Workflow and validate that all status has Yes selected
- Create will be set to Yes
- Expand Edit Item and select Yes at the top level and appropriate editing permissions
- Expand Workflow Name for Service Request Workflow and select No for the state of Closed. All other states are set to Yes
- Select the Field Permissions section and validate that necessary fields are set to Edit. Specifically, the fields of Subtask Sequence Complete, Subtask Sequencing, and Template Name will be set to edit as these fields are affected by a business rule
Select the Workflow Permissions section and expand Service Request and Service Request Workflow. Validate that Access is set to Yes for Start to In-Progress
CAVEATS
When the New Hire ticket is created, there are four subtasks created. As each stage is Resolved, the next stage of subtasks is set to the Open status. These subtasks will remain as unable to edit until the logged in user refreshed the web page or performs a logout and login.
Republished; originally published March 14, 2017
