In Winter, 2018, one new feature was being able to use Dependent Picklists in Self-Service. For me, it was a bit of a head-scratcher to figure out how to do it, so I thought I’d write it up.
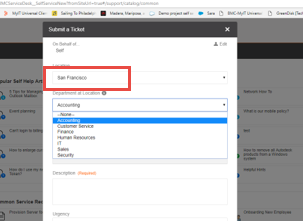
First, let’s look at the result. When you put a dependent picklist into incident self-service (“Submit a Ticket”), you get a field B that depends on field A. So below, if I choose San Francisco as my location, I get one set of drop-downs in the department field; if I choose New York, I get a different set:
You can do a similar setup for Service Requests. Before we look at how that is done, I want to address a couple of common questions:
- Don’t we have conditional questions on Service Requests anyway? Yes – absolutely. And I recommend continuing to use them because of the answer to the next question. But this feature is using Salesforce Dependent Fields functionality, and it does give us a dependent set of questions on the “Submit a Ticket” form.
- Can I use different Dependent Fields on different Service Requests? NO – when you add Dependent Fields to your Request form, they will appear on every single service request. So unless there is something you want people to answer on every service request, keep using conditionals.
Ok, let’s set this up.
The first thing is you might want to read up on Dependent Fields on the Salesforce site: https://help.salesforce.com/articleView?id=fields_defining_field_dependencies.htm&type=5
Next, check your setting in Remedyforce Administration/Configure Self-Service/Service Requests. Uncheck the box by “Use the fields from Service Request Right Panel and Left Panel field set instead of Request Details Self Service 3.0 in Self Service 3.0” (if you will be using this for Service Requests).

Create your fields. Below, I’ve created Location and Department at Location, both as picklists, on my Incident Object (if you are doing this for Service Requests, add them to the Request Detail object):
![]()
![]()
Then create the Dependency – click this button at the top of the Custom fields list:

Click on New, choose your controlling and dependent field (in my case, these are Location and Department at Location), and get to this screen:
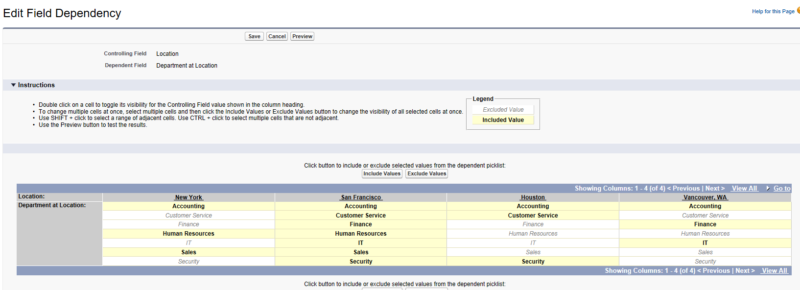
Highlight the appropriate values for each column, and “include” or “exclude” as needed, and then Save.
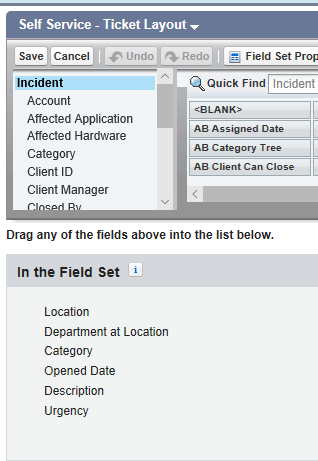
Final step: you need to add them to the appropriate field set. For the Incident object, it’s “Self Service – Ticket Layout”; for the Request Detail object, it’s “Request Details Self Service 3.0”. Below is my Self-Service-Ticket Layout fieldset:
And now they will be visible on the “Submit a Ticket” form (where we started this write-up).
I would be very interested in your use cases for this feature; I was drawing a bit of a blank, but I’m not out in the “real world”, so let me know what you use this for!