If you are a Jira admin, you know that the very heart of Jira is the workflow. One of the key jobs that you have is to work with your users to implement workflows that are both simple and effective to meet their needs. I am sure that there are times when your user has requested a particular workflow capability that is far outside the normal ticket flow. This article discusses one such request.
Occasionally, a user will ask for an action that can be executed from any status without changing the current status of the ticket. I had one client who needed to be able to execute a particular set of post-functions at any point within the workflow without changing the status of the ticket. We looked at several approaches to address this requirement and settled on a “No-Transition transition”.
This is very different from a transition that returns to the same status. In the image below, you see a very simple workflow: Open → In Progress → Done. I have added a transition from In Progress back to itself called “Do It”.![]()
This is a very standard way to allow execution of a set of post-functions without changing the status. You have probably implemented this dozens of times in your own environment. The problem with this solution is that it only works from the “In Progress” status. You can’t run it from Open or Done.
You could implement the same transition on Open and Done as well, but then you have three transitions that you have to maintain instead of one. If you have a more complex workflow with 8 or 10 steps, this approach quickly turns into a nightmare.
We needed a way to have the transition be globally available, regardless of the status. Fortunately, in Jira Server, this is possible by doing some manual manipulation of the workflow. Here is how you can do it.
The steps that you will take to implement this are:
- Create your base workflow
- Export the workflow as XML
- Make a small change in the XML
- Import the XML as a new workflow
Here are the details:
Create your base workflow
For our purposes, we are going to use the workflow that we created above. Instead of having the “Do It” transition go from “In Progress” to itself, we are going to create a new Status called “Do It” indicating that all statuses can transition to this one.
![]()
Notice that if you left this workflow as is, you could never exit the “Do It” status. Our next steps will solve that.
Export the workflow as XML
Now that you have the base workflow ready, you need to export it as XML. Pull down the Export button and select “As XML” and export the workflow.
Make a small change in the XML
Open the XML file in a text editor or XML editor. I use Notepad++, but you can use any text editor or IDE that will allow you to edit an XML file.
With the XML file opened, search for the transition. This will be in an “action” XML tag. Here are the key lines from my XML file
<global-actions>
    <action id="31" name="Do It">
      <meta name="jira.description"></meta>
      <meta name="jira.fieldscreen.id"></meta>
      <results>
        <unconditional-result old-status="null" status="null" step="4">
The key line from the above snippet is the line that reads “<unconditional-result old-status=”null” status=”null” step=”4″>. You need to change the step=”4” to be step=”-1”
Also note that this action is in a section called “<global-actions>”. That is accomplished by using the “All statuses transition to this status” option. If you have other “All” transitions, they will also appear in this section. Make sure that you take care to update the right one.
Import the XML as a new workflow
Now you are ready to import the workflow. Go to the Workflows page and “Import As XML”
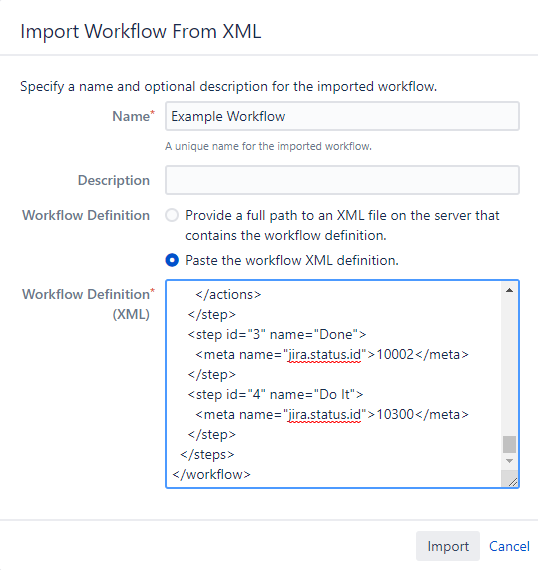
You will need to give your workflow a new name since the name you used is already taken.
Select the “Paste the workflow XML definition” option and paste in the XML from your editor, as shown above.
The new workflow will show up under the Inactive list, since it is not yet used in a Workflow scheme. When you look at the workflow in Diagram mode, it will look like this:
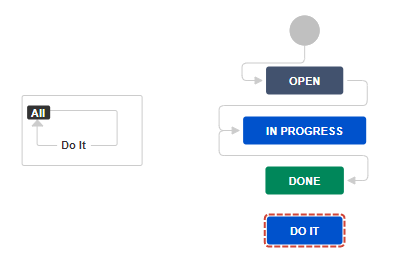
The “Do It” status and transition have been disconnected from each other. This transition will be available regardless of the current status of the issue. You can delete the “Do It” status from the workflow. We can never reach it anyway.
This new “Do It” transition has all of the properties and capabilities of a regular transition. You can set Conditions and Validators on it. You can add whatever post-functions you want. It will work just like any other transition, except that it is always available and never changes the current status of the issue.